Waterproofing your basement is vital for preventing moisture-related issues. Start by evaluating potential moisture sources, then prepare the area by clearing any debris. It’s essential to repair cracks and holes in the walls and floors before applying a waterproofing membrane. Understanding the different types of membranes available can greatly impact your results. After ensuring proper application, you’ll want to take into account additional measures to maintain your basement’s integrity long-term.
Key Takeaways
- Inspect your basement for moisture sources like leaks, condensation, and groundwater seepage before starting waterproofing.
- Repair any cracks or holes in walls and floors using appropriate sealants to prevent moisture intrusion.
- Choose a waterproofing membrane, either liquid-applied or sheet, and prepare surfaces by cleaning and repairing.
- Apply the waterproofing membrane evenly, following the manufacturer’s guidelines for drying times and application thickness.
- Maintain your waterproofed basement by regularly inspecting for moisture signs and keeping humidity levels below 60%.
Assessing Your Basement for Moisture Issues
How can you effectively identify moisture issues in your basement? Start by inspecting for moisture sources like leaks, condensation, or groundwater seepage.
Use a hygrometer to measure humidity levels; ideally, they should be below 60%.
Check for water stains on walls, floors, and around windows, as these can indicate persistent dampness.
Pay attention to musty odors, which often signal mold growth due to high humidity.
Examine the foundation for cracks, as they can allow moisture intrusion.
Preparing the Area for Waterproofing
Before starting the waterproofing process, you need to clear out any debris from the basement to guarantee a clean workspace.
Once the area is clear, inspect for any damage, such as cracks or leaks, that may require repair before applying waterproofing measures.
Addressing these issues now will enhance the effectiveness of your waterproofing efforts.
Clear Out Debris
To effectively waterproof your basement, start by clearing out any debris that may obstruct the process.
Begin with thorough debris removal, focusing on loose items, old boxes, and any unnecessary clutter. Use trash bags for smaller items and consider a dolly for heavier objects.
Make sure you manage clutter effectively by organizing what you plan to keep and discarding what you don’t need. This step is essential, as a clean workspace not only facilitates easier access but also guarantees that you can accurately assess the surfaces needing treatment.
A clutter-free environment will set the stage for a successful waterproofing project.
Inspect for Damage
Once you’ve cleared the area, it’s imperative to inspect for any damage that could compromise your waterproofing efforts.
Focus on identifying damage types like cracks in the walls, deteriorated mortar, or mold growth. Use inspection methods such as visual examination and moisture meters to detect hidden issues.
Check for signs of water intrusion, including efflorescence or peeling paint. Document all findings, as addressing these problems is vital before applying waterproofing materials.
Ignoring these issues can lead to costly repairs later. By thoroughly evaluating your basement, you’ll guarantee a more effective waterproofing solution.
Repairing Cracks and Holes in Walls and Floors
To effectively waterproof your basement, you need to start by identifying any cracks and holes in the walls and floors.
Once you’ve pinpointed these issues, you’ll choose suitable repair materials that match the severity of the damage.
Finally, you’ll apply the appropriate repair techniques to guarantee a long-lasting seal against moisture.
Identifying Cracks and Holes
Cracks and holes in your basement walls and floors can lead to significant moisture issues, so it’s essential to identify them early.
Start with crack identification: look for vertical, horizontal, and diagonal cracks, noting their size and direction. Use a flashlight to illuminate hidden areas.
For hole assessment, inspect for gaps that might allow water entry. Pay close attention to corners and joints, as these are common weak points.
Measure the dimensions of each crack and hole, and document their locations. This thorough evaluation will help you prioritize repairs and prevent future water damage in your basement.
Choosing Repair Materials
When selecting repair materials for cracks and holes in your basement walls and floors, it’s essential to evaluate the specific type and extent of the damage. Different material types can greatly influence the effectiveness of your repair techniques.
| Material Type | Best For | Application Method |
|---|---|---|
| Epoxy Sealant | Small cracks | Inject into the crack |
| Hydraulic Cement | Large holes | Mix, apply, and smooth |
| Polyurethane Foam | Extensive moisture leaks | Spray or inject |
| Concrete Patch | Surface repair | Trowel into the area |
Choose wisely to guarantee a successful repair!
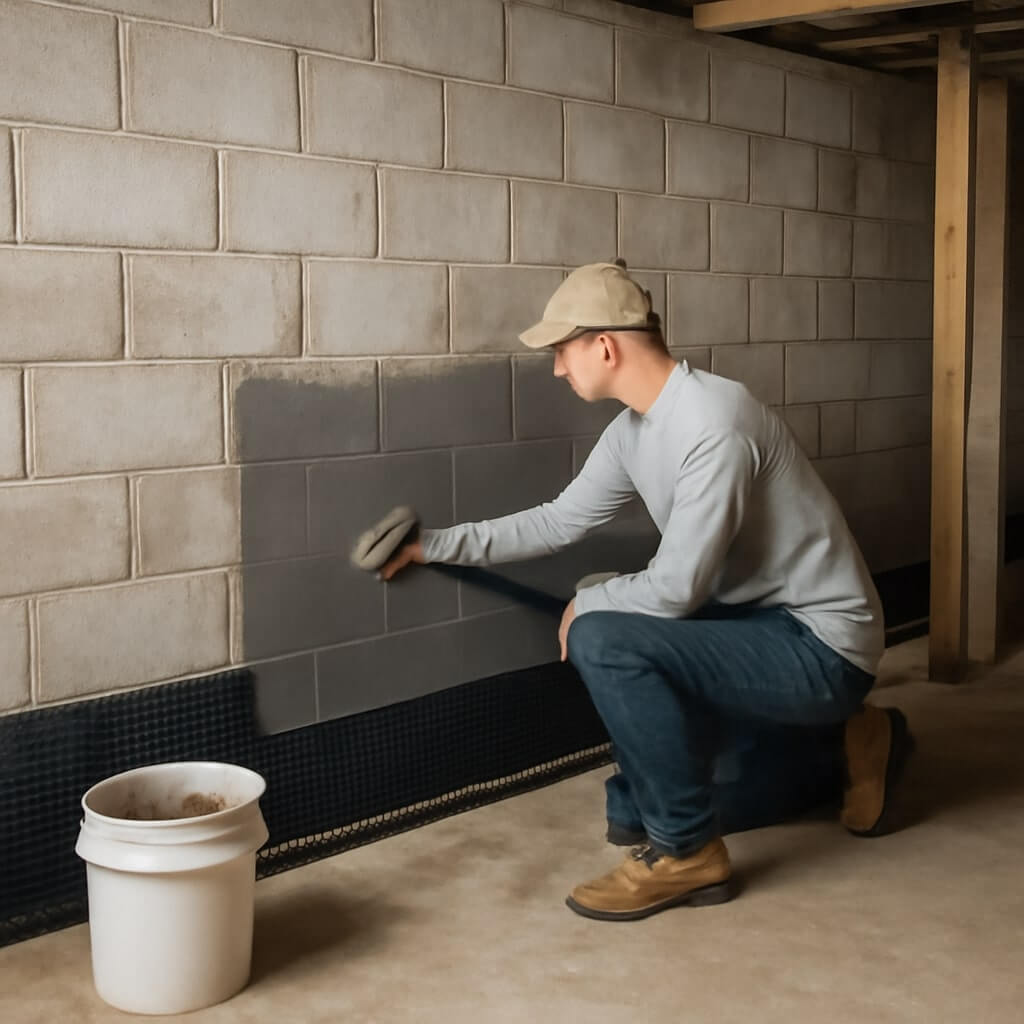
Applying Repair Techniques
Start by thoroughly cleaning the area around the damage to guarantee proper adhesion of your chosen repair material. Use a wire brush to remove loose debris and dust.
Next, apply a suitable epoxy or polyurethane sealant to cracks and holes, following the manufacturer’s instructions for waterproofing products. For larger gaps, consider using a hydraulic cement that expands as it cures, ensuring a tight seal.
Once applied, smooth the surface with a trowel for a clean finish. Allow the repair to cure fully before testing for leaks.
Regularly inspect these areas to maintain effective repair techniques and prevent future issues.
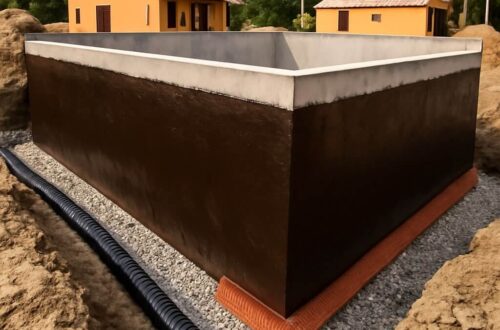
Applying a Waterproofing Membrane
Applying a waterproofing membrane is essential for preventing moisture infiltration in your basement. Start by selecting appropriate membrane types, such as liquid-applied membranes or sheet membranes, based on your specific needs.
Prepare the surface by cleaning and repairing any cracks. For liquid-applied membranes, use a roller or brush to apply an even coat, ensuring full coverage.
If you opt for sheet membranes, carefully align and press them against the wall, sealing edges with adhesive. Follow the manufacturer’s guidelines for drying times and application thickness.
This step is vital for a long-lasting barrier against water damage and mold growth.
Installing Interior Drainage Systems
Although installing an interior drainage system may seem intimidating, it’s an essential step in managing water intrusion and protecting your basement.
Start by evaluating your drainage design, guaranteeing it directs water towards a central collection point.
Dig a trench around the perimeter of your basement, then install a perforated drain pipe at the bottom, covered with gravel for filtration.
Connect this pipe to a sump pump, which will efficiently expel water outside.
Finally, cover the trench and verify the sump pump is properly wired and tested.
This proactive measure will considerably reduce the risk of future water damage in your home.
Sealing Windows and Doors
When it comes to waterproofing your basement, sealing windows and doors is essential, as even small gaps can allow moisture to seep in and compromise your efforts.
Begin by checking for any drafts or leaks around your windows and doors.
Use the following tools and materials to guarantee effective window insulation and door sealing:
- Weatherstripping tape
- Caulk or sealant
- Foam insulation
- A utility knife
- A caulking gun
Apply weatherstripping to movable parts and caulk around stationary frames.
This not only keeps moisture out but also enhances energy efficiency, protecting your basement from potential water damage.
Maintaining Your Waterproofed Basement
To guarantee your basement remains waterproofed, regular maintenance is essential.
Begin by conducting regular inspections to identify any signs of moisture or damage. Check for cracks in walls and floors, confirming they’re sealed properly.
Regularly inspect for moisture signs and ensure all cracks in walls and floors are properly sealed.
Maintain humidity levels below 60% to prevent mold growth; use dehumidifiers if necessary.
Inspect gutters and downspouts to verify proper drainage away from your foundation. Additionally, clean window wells and make sure they’re clear of debris.
Don’t forget to monitor sump pumps for functionality, testing them monthly.
Conclusion
By following these step-by-step waterproofing instructions, you can effectively protect your basement from moisture issues. Regularly inspect your waterproofed space, manage humidity, and guarantee proper drainage around your foundation to maintain its integrity. Remember, a dry basement not only enhances your home’s comfort but also increases its value. Stay proactive in your maintenance efforts to prevent any future problems and enjoy a safe, dry environment for years to come.