When it comes to waterproofing your basement walls, a systematic approach is vital. Start by evaluating the condition of your walls for cracks or signs of moisture, which can lead to bigger problems if left unchecked. Once you’ve identified any issues, you’ll need to prepare the surface properly before applying a suitable sealant. Understanding the right methods and products is critical, especially if you want to guarantee long-term protection against water intrusion. What’s your next step?
Key Takeaways
- Conduct a thorough visual inspection of basement walls for cracks, discoloration, and signs of moisture before starting the waterproofing process.
- Choose the appropriate waterproofing method, such as sealants for minor issues or drainage systems for chronic moisture problems.
- Prepare the surface by cleaning walls, removing dirt and debris, and repairing any visible cracks or holes before applying waterproofing products.
- Apply waterproofing sealants evenly, focusing on joints, cracks, and seams, using suitable application tools like brushes or rollers.
- Consider installing a drainage system to effectively manage water intrusion and reduce humidity levels in your basement.
Assessing the Condition of Your Basement Walls
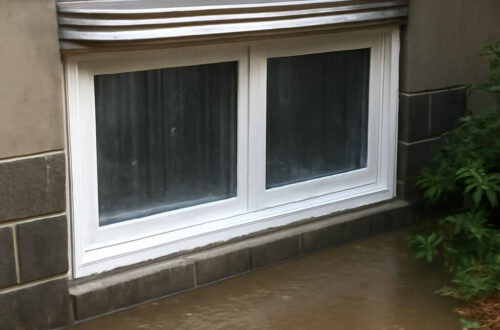
Before you can effectively waterproof your basement walls, it’s essential to assess their current condition. Start with a thorough visual inspection, checking for cracks, discoloration, or efflorescence, which indicates moisture presence.
Pay close attention to corners and joints, where water often infiltrates. Next, conduct moisture testing using a simple plastic sheet: tape it to the wall and leave it for 24 hours. If condensation forms underneath, your walls are damp.
Document these findings, as they’ll guide your waterproofing strategy. By understanding the state of your walls, you’ll guarantee that your efforts yield the best results for long-term protection.
Choosing the Right Waterproofing Method
Having assessed the condition of your basement walls, it’s time to select the most effective waterproofing method.
Consider these options, weighing cost considerations against long-term benefits:
- Sealants: Affordable and easy to apply, ideal for minor issues.
- Interior Drainage Systems: More expensive but effective for chronic moisture problems, preventing water buildup.
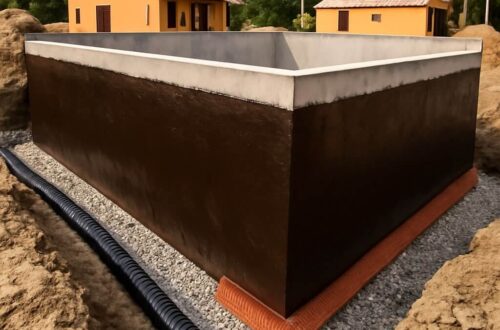
- Exterior Waterproofing Membranes: The most costly option, offering durable protection by addressing the source of water intrusion.
Choosing the right method can save you from costly repairs in the future while ensuring a dry, usable basement space.
Prioritize your specific needs for the best results.
Preparing the Surface for Waterproofing
Before applying any waterproofing solution, you need to guarantee your basement walls are clean and dry.
Remove any dirt, cobwebs, or debris, and check for cracks and holes that require repair.
Addressing these issues will create a solid foundation for effective waterproofing.
Clean and Dry Walls
To guarantee effective waterproofing, you must start with clean and dry walls, as any contaminants or moisture can compromise your efforts.
Begin by thoroughly inspecting your walls and addressing any issues that could lead to mold growth or moisture retention.
Follow these steps for ideal results:
- Remove dust, dirt, and debris using a vacuum or brush.
- Use a damp cloth to wipe down surfaces, ensuring moisture control.
- Allow walls to dry completely before applying any waterproofing products.
Repair Cracks and Holes
Once you’ve verified your basement walls are clean and dry, it’s crucial to inspect them for any cracks or holes that could allow water intrusion.
Start with crack identification; look for hairline fractures or larger gaps that may compromise your waterproofing efforts.
Next, conduct a hole assessment by checking for any voids or punctures.
For cracks, use a concrete repair caulk or epoxy filler, making sure you fill them completely.
For holes, patch them with hydraulic cement to create a watertight seal.
Once repaired, allow adequate curing time before applying your waterproofing solution to guarantee the best results.
Applying Waterproofing Sealants
When applying waterproofing sealants, choosing the right product is essential for effective protection.
You’ll need to take into account factors like the type of wall surface and the specific moisture conditions in your basement.
Once you’ve selected your sealant, proper application techniques will guarantee optimal results and long-lasting waterproofing.
Choosing the Right Sealant
Selecting the right sealant is vital for effectively waterproofing your basement walls. Different sealant types offer various benefits, so it’s important to choose one that suits your needs.
Consider the following factors:
- Waterproofing strength: Look for sealants labeled as waterproof or water-resistant.
- Durability: Choose products that withstand temperature fluctuations and moisture exposure.
- Application tools: Make sure you have the appropriate tools, like brushes or rollers, for a smooth application.
A well-chosen sealant not only protects your basement but also enhances its longevity.
Make informed decisions to safeguard your home against water damage effectively.
Application Techniques Explained
Having chosen the right sealant, it’s time to focus on applying it correctly to guarantee maximum effectiveness.
Start by cleaning the surface thoroughly—remove dust, dirt, and any loose materials. Next, use a brush or roller for even application of your waterproofing products; this guarantees full coverage.
Pay special attention to joints, cracks, and seams, where moisture is likely to penetrate. For larger areas, consider using a sprayer, but keep the distance consistent for uniformity.
Allow the first coat to dry completely before applying a second layer, following the manufacturer’s recommended drying times to enhance durability and performance.
Installing a Drainage System
To effectively manage water intrusion in your basement, installing a drainage system is crucial.
Effectively managing water intrusion in your basement starts with the crucial step of installing a drainage system.
This system offers numerous drainage system benefits, including:
- Prevention of water pooling: Keeps your basement dry by channeling water away.
- Reduced humidity levels: Lowers moisture, decreasing mold growth risk.
- Increased property value: A waterproofed basement enhances your home’s marketability.
For proper drainage system installation, assess your basement’s layout and select the right type of system—interior or exterior.
Verify all components are fitted correctly, and consider professional assistance for optimal outcomes.
A well-installed drainage system greatly reduces future water damage risks.
Maintaining Your Waterproofed Basement
After installing a reliable drainage system, maintaining your waterproofed basement becomes essential for long-term protection against water damage.
Conduct regular inspections to identify any signs of moisture or leaks. Check walls and floors for damp spots, and verify that your drainage system is functioning properly.
Implement moisture control measures like using dehumidifiers and verifying proper ventilation. Address any cracks immediately by sealing them with appropriate materials.
Conclusion
By following these steps, you can effectively waterproof your basement walls and protect your home from moisture damage. Start with a thorough inspection, choose the right waterproofing method, and properly prepare your surfaces. Applying sealants carefully and considering a drainage system for chronic issues will guarantee long-lasting protection. Remember to maintain your waterproofed basement regularly to keep it safe from water intrusion. With diligence, you’ll create a dry, comfortable space that stands the test of time.