
When it comes to waterproofing your basement on a budget, you’ve got several effective options at your fingertips. From simple sealing techniques to DIY drainage solutions, you can tackle moisture issues without breaking the bank. Start by evaluating your basement’s vulnerabilities and consider how you can redirect water away from your foundation. Curious about the most cost-effective methods to keep your space dry? Let’s explore your best options.
Key Takeaways
- Conduct a thorough foundation inspection to identify and seal cracks using affordable waterproof caulk.
- Improve yard grading by sloping soil away from the foundation to prevent water pooling.
- Install gutters and downspouts to divert rainwater away from the basement, ensuring regular maintenance.
- Create a simple French drain system using perforated pipe and gravel to manage excess water.
- Use moisture barriers and affordable fiberglass insulation to reduce condensation and moisture buildup.
Assessing Your Basement’s Vulnerabilities
Before you can effectively waterproof your basement, it’s essential to assess its vulnerabilities.
Start with a thorough foundation inspection; look for cracks, gaps, or signs of water damage. Identify potential moisture sources, such as leaking pipes, groundwater, or surface water runoff.
Don’t forget to check windows and vents for leaks, too. Pay attention to any areas where water seems to gather during heavy rain.
Document your findings, as this will guide your waterproofing efforts. By understanding these vulnerabilities, you can take targeted action to protect your basement from moisture intrusion and guarantee a dry, safe space.
Grading Your Landscape for Proper Drainage
One of the key steps in waterproofing your basement is grading your landscape for proper drainage. You want to create a landscape slope that directs water away from your foundation.
Start by evaluating your yard’s current grade; it should ideally drop at least six inches over the first ten feet from your house. Use simple drainage techniques like adding soil or using a shovel to achieve this slope.
Make sure that flower beds and gardens are also sloped away to avoid pooling water. Proper grading not only protects your basement but also enhances your overall landscape’s health and appearance.
Installing Gutters and Downspouts
Installing gutters and downspouts is essential for keeping water away from your basement.
You’ll want to guarantee proper gutter placement to effectively channel rainwater, while extending downspouts can greatly reduce the risk of pooling around your foundation.
Proper Gutter Placement
Proper gutter placement is vital for keeping your basement dry and preventing water damage.
Start by selecting the right gutter types for your home, such as K-style or half-round, to suit your roofline and climate. Make sure gutters are installed with a slight slope toward the downspouts for peak drainage.
Regular gutter maintenance is essential; clean them out at least twice a year to prevent clogs that can lead to overflow.
Position downspouts at least six feet away from your foundation to direct water away effectively.
With the right placement and upkeep, you’ll protect your basement from unwanted moisture.
Downspout Extension Importance
After ensuring your gutters are well-placed and maintained, the next step in safeguarding your basement is installing downspout extensions.
These extensions increase your downspout length, directing water further away from your foundation. Proper water diversion is essential; without it, rainwater can pool around your home, leading to leaks and mold.
Aim for extensions that are at least 4 to 6 feet long, depending on your yard’s slope. Regularly check these extensions for clogs or damage to maintain their effectiveness.
Sealing Cracks and Gaps With Caulk
While your basement may seem like a fortress against moisture, even the smallest cracks and gaps can invite unwanted water into your home. Start with crack identification—inspect walls and floors for signs of damage. Once you’ve found the culprits, it’s time for caulk application. Choose a high-quality waterproof caulk for the best results.
| Step | Action | Tips |
|---|---|---|
| 1 | Identify cracks | Use a flashlight |
| 2 | Clean the area | Remove dust/debris |
| 3 | Apply caulk | Smooth with finger |
| 4 | Let it cure | Follow manufacturer’s instructions |
| 5 | Inspect again | Check for leaks |
This simple process can save you from costly water damage.
Applying Waterproof Paint or Sealant
Transform your basement into a moisture-resistant haven by applying waterproof paint or sealant.
Start by cleaning the walls to remove dirt and mildew. Once the surface is dry, choose a high-quality waterproof paint or sealant that suits your needs.
Begin by thoroughly cleaning the walls to eliminate dirt and mildew, then select a top-notch waterproof paint or sealant for optimal results.
For the best results, follow the manufacturer’s instructions for application. Use a brush or roller to guarantee even coverage, paying extra attention to corners and edges.
Allow it to cure fully before moving furniture back in. This simple sealant application can effectively block moisture, preventing damage and creating a more comfortable space.
Your basement will thank you for it!
Utilizing a Dehumidifier
How can you keep your basement dry and comfortable? Utilizing a dehumidifier is an effective way to manage moisture control. By adjusting the dehumidifier settings, you can maintain ideal humidity levels, preventing mold and mildew growth.
| Dehumidifier Settings | Ideal Humidity Level | Benefits |
|---|---|---|
| Low | 30-50% | Prevents dampness |
| Medium | 50-60% | Reduces musty odors |
| High | 60%+ | Protects belongings |
Investing in a dehumidifier not only enhances the air quality but also protects your basement from water damage.
Creating a French Drain System
If you’re looking to keep your basement dry, creating a French drain system is a smart choice.
You’ll need specific materials and a clear step-by-step guide to guarantee a successful installation.
Let’s break down what you’ll need and how to get started!
Materials Needed Overview
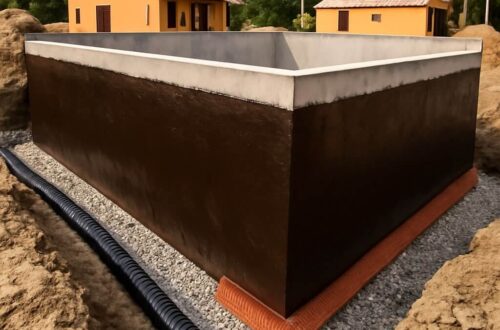
Creating a French drain system requires just a handful of essential materials to effectively redirect water away from your basement.
You’ll need perforated drainage pipe, gravel, and landscape fabric to keep soil out of the drain.
Don’t forget waterproofing materials like tar or a waterproofing membrane to protect your foundation walls.
Effective sealants are vital for sealing any gaps or cracks that could allow water to seep through.
Additionally, a shovel and a level will help you dig the trench and guarantee proper slope for drainage.
With these materials, you’ll be well-equipped to tackle your basement waterproofing project.
Installation Steps Guide
To install a French drain system effectively, you’ll want to follow a series of straightforward steps.
First, gather your basement waterproofing materials: a perforated pipe, gravel, and filter fabric.
Next, dig a trench around your basement, sloping it toward a drainage outlet.
Lay down the filter fabric, then add gravel to create a bed for the perforated pipe.
Place the pipe in the trench, guaranteeing the holes face downward.
Cover it with more gravel and fold the fabric over the top to prevent sediment buildup.
Finally, backfill the trench and guarantee water flows freely.
You’ve just employed DIY waterproofing techniques!
Using Sump Pumps for Water Removal
A sump pump is an essential tool for keeping your basement dry and free from water damage. When choosing a sump pump, consider various sump pump types, including submersible and pedestal options. Here are some quick installation tips to keep in mind:
| Sump Pump Type | Benefits | Installation Tip |
|---|---|---|
| Submersible | Quiet, efficient | Place below water table level |
| Pedestal | Easy to access | Confirm it’s mounted securely |
| Battery Backup | Power outage support | Test regularly for functionality |
Insulating Walls to Prevent Condensation
While you may not realize it, insulating your basement walls is essential for preventing condensation and maintaining a dry environment.
By adding thermal insulation, you create a barrier that keeps the warmth inside and reduces the temperature difference between your walls and the moist air. This helps minimize condensation build-up.
Don’t forget to install moisture barriers before insulating; these will protect against water vapor that can seep through walls.
You can use foam boards or fiberglass insulation, which are effective and affordable options.
With proper insulation, you’ll guarantee a more comfortable basement and protect your home from moisture damage.
Regular Maintenance and Inspection Tips
Regular maintenance and inspection of your basement can prevent costly water damage and keep your space dry.
Set up regular maintenance schedules to check for cracks, leaks, and signs of moisture buildup. During your basement inspections, pay attention to the walls, floors, and around windows. Look for any discoloration or damp spots, which could indicate a problem.
Clean gutters and downspouts regularly to guarantee proper drainage away from your foundation. Don’t forget to inspect sump pumps and dehumidifiers, making sure they’re in good working order.
Conclusion
By implementing these budget-friendly techniques, you can effectively waterproof your basement and protect your home from moisture damage. Start with simple tasks like sealing cracks and grading your landscape, then consider more involved solutions like a French drain or sump pump. Regular maintenance is key, too—keep an eye on your gutters and inspect for any new vulnerabilities. With a little effort and creativity, you can create a dry, safe space without breaking the bank.